The Radmalls

The Radmalls

Monday, November 25, 2013

Trip to Vegas & The Throwing Merit Badge

Last weekend we took a quick weekend trip down to Vegas to visit Tyler's family and go to my friend's baby shower.  It was perfect timing because we got out of Utah just in time to miss the first big snow storm and instead enjoyed 60 degree weather.

The highlight of the trip was going to the Bellagio Gardens and Watershow.  Payton LOVED it.


We had a great time!

I came in late to bed one night and Tyler had been asleep for a few hours.  He immediately sat up and asked me what I was doing out there.  I told him that I was just watching TV and getting a drink and he was not happy with that answer.  He started yelling things that I could not understand at all.  Then he went back to sleep...or at least I thought he did.  After brushing my teeth he sat up again and asked me why I didn't get my "throwing merit badge" and told me I was stupid for not getting it.

He just got called a few months ago as the ward's 11 year old boy scout leader.  He works with them every week on different merit badges.  Apparently he created a new merit badge because I'm pretty sure there is no such thing as the throwing merit badge.  He loves his calling and apparently puts a lot of effort and thought into it if he is sleep talking about it.  I love my husband!


Brightening Up the Kitchen

I LOVE the colorful view looking into the living room from the entry hallway.

  
The view into the kitchen from the living room has definitely improved since we painted the kitchen cabinets and installed the hardware, but it lacks....color.


The only color in the kitchen is the faint blue in the stained glass cabinet doors and the ABC magnets that Payton plays with on our fridge.  So for my next few projects I wanted to focus on brightening up the kitchen with some color. 

First project: curtains for the kitchen window

I wanted to keep with generally the same colors of the living room because the kitchen opens up to it.  But I also thought it might be fun to throw in some new colors.  So I went to the fabric store and brought home 4 different samples and Ty and I decided on this one.


I do NOT sew, plus I don't even own a sewing machine.  So I bought some of this Heat and Bond iron-on hem and it is SO easy.  I'm not ever buying curtains anymore.  They are a rip-off.  I bought all these materials for less then 2 84" curtain panels at target.

Curtain Rod: Walmart for $4
Heat & Bond: Walmart for $2
Curtain Clips: Walmart for $12 for two packs
Fabric: $20

Total: $38

Step 1: Measure the window & cut the fabric 2" longer in width and height to allow for 1" hems all the way around.


Step 2:  Place the Heat & Bond strip 1" underneath the top of the fabric panel.  


Step 3: Iron slowly to allow application


Luckily I had nice straight lines on my fabric to make it really easy to get the hem straight.


Step 4: Repeat on all edges of both panels


Here is the finished product.  It brightens up the kitchen perfectly.


Second Project: plate wall above dining table

I found these beauties at DI for $1 each and thought this little wall strip was a perfect place for them.


I am on a tight budget and to be honest rather cheap.  So I had a lapse of judgment and thought that hot glueing large safety pins on the back of the plates would work to hang the plates instead of having to buy plate hangers.  To help my case I did read several blogs that said this worked for them.  Well it definitely didn't work for me.

Disclaimer: It only holds the plates for 10 minutes.  I lost a plate in the process.


So I bought these on Amazon and now I never have to worry about a plate falling on my head while I'm eating.


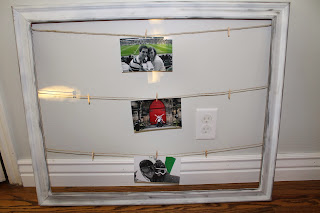
Third Project: clothespin frame with extra curtain fabric

I got this idea from pinterest, but decided to back it with my extra curtain fabric instead of having an empty frame.

I bought this frame (already white) from DI for $4


and bought both the twine and the miniature clothespins for about $7 
(the twine was $5)

So this project was a grand total of $11.

I first removed the old burlap fabric


Then I hot glued the twine near the top of the frame on both sides


In order to measure without using a tape measure (aka - the lazy way) I used pictures to hang to somewhat evenly space the three layers of strings.


Then I placed the new fabric on the thick piece of cardboard and tightly secured it in place from the back.

Because of the bright colors in the fabric I wanted to order a bunch of black and white photos.  


Fourth Project: DIY art

I found these 3 blank canvases at DI (of course) a few months ago and have been wanted to do something with them ever since.  Of course I looked at pinterest for ideas and really liked this and this.


There are so many bright colors in the room so I really wanted to use some darker colors.  I printed off a silhouette of a bird and a feather and spray painted them gold.


Then I spray painted the canvases navy blue


Then I sprayed one last coat of blue paint and placed the feather and bird on before the paint dried so it worked like glue.  


I also spray painted a leaf that I got from my tree a few weeks ago, but I haven't found a place in my house yet for this one.


So here is our new and colorfully updated view into our kitchen from the living room.


That brown table is such an eye sore for me with the colors we chose.  It is a beautiful table but the color just doesn't go.  We are still trying to sell it so we can buy a smaller black table.  

Thursday, November 7, 2013

Gallery Wall

For the first 3 months of living in our house we had no decorations upstairs.  Usually when you first move into a house after unpacking the first thing you do is make it feel homey by putting up decorations.  Because we had so much to do at first (painting, ripping up tile, carpeting, and more painting) we got so tired and just gave up on the whole decoration thing.

Now that things have slowed down we can now put up some decorations to make the house feel more like a home.  The first place to start.  Above the fireplace.

You can tell from this picture that despite our best efforts of filling holes and painting, you can still see damage to the wall above the fireplace.  I debated putting up a big mirror in the middle like this by my amazing sister in law at Simple Sage Designs, but it wouldn't cover up the far left and right part of the damage.  


So we decided to do a gallery wall.


I bought a bunch of different sized frames from my favorite budget friendly decor store lately (DI) and painted them all white.  

I filled the left upper two frames with leftover fabric I had.  The bottom left was a free printable that I found online.  The right two pictures are obviously art that I did myself…haha.  I will blog later about those two FREE projects. The middle frame is the only thing I paid for.  The wooden R was a few dollars from JoAnns on sale and the fabric was $1.  So this project including the frames cost a grand total of $10.


So I read several blogs about the best way to hang a gallery wall in one try without putting a million holes in your wall. A lot of blogs like this one said to use paper to cut out the exact size of each frame and tape those to the wall first and then use nails for the real frames.  If we had a larger gallery wall we probably would have done it, but we just positioned it on the ground the way we wanted it.  Other then that all you need is a tube of toothpaste (yes toothpaste) and another set of eyes.

So you put the toothpaste on the back of the frame where the nail would go like this.


Then you place it up on the wall where you want it using someone else behind you to tell you if it looks center (or how you want it).


And the toothpaste is left behind on the wall.  


So then you simply nail where the toothpaste is and wash it off.


Works like a charm.


So we kept doing that process picture by picture and it literally took 5 minutes.


No re-nailing.  There are only 6 holes in that wall.


 Here is Tyler enjoying our cosy living room after working up a sweat hanging pictures.